Wednesday, August 24, 2011

Dry erase marker board

My husband and I need a more organized meal plan! Something to help us from going out to eat on a whim and spending $15-30.00, because no one wants to cook ;). Does that sound familiar? So, time to make a dry erase marker board. This way we can keep track of our weekly events and menu! I saw this idea on the DIY page of Pinterest.com (looooove that website by the way!). The nice thing about making your own board, you can switch out the background color to match the season!

Supplies:
          - hot glue gun
          - magnets
          - dry erase markers
          - 12 X 12 scrapbook paper of your choice
          - 12 X 12 frame (if you are to make it a magnetic board, you must choose a frame
                          light enough to hold on the fridge with magnets)


First I glued 14 magnets to the back of the frame. Then, I popped the orange 12 X 12 paper in the frame and finished with the written details! So very easy and I love it! -Laura

Thursday, August 11, 2011

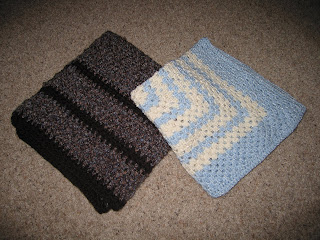
baby boy blankets


These are the finished baby boy blankets I made for my mom. She asked me to make them for a few upcoming baby showers. I really like they way they turned out! The blue and brown blanket was super think and soft. The thicker yarn also works up faster ;). The white and blue one was a typical baby yarn which took a lot longer to make but it is very light and stretchy. Always feels good to get big projects done!

Tuesday, August 2, 2011

Jam Jar Tags

This project was inspired by a trip to Walmart a few weeks ago. While in the checkout isle, I was looking through the candy and found a package of canned good tags. Someone had obviously made a last minute decision to not buy them. They were adorable! I almost bought them myself, but then I thought... well shoot I could make that! My mom still makes homemade jams, salsa, and spaghetti sauce. So this is for her :).

1)-Supplies include:
               Fabric, pen or sharpie, paper hole puncher, scissors and/or paper cutter.
2)-I bought the 12x12 card stock at Hobby Lobby (50% off, yay!). First, I cut the paper
               into 3" long strips.
3)-Then I cut the strips into 2" wide pieces.
             

4)-Using the fine point sharpie, individualize/personalize your cards
5)-I LOVE this fabric. I found it at a garage sale for 10 cents! hurray! Cut the strips about
                3/4" wide and 15" long.
6)-I then glued on a few buttons. FINALLY, twist the fabric slightly and tie around the
                neck of the jar or around band of the lid. I trimmed a little fabric off and TADA.
         
 I really like the way they turned out! There are plenty of ways to change this project to make it your own. It is super easy, and can be a great gift for those who are masters of the kitchen! - Laura